If you’re a fan of origami or looking for a fun way to spend an afternoon, look no further than these free easy origami instructions. With just a few sheets of paper, you can create all sorts of animals, including adorable penguins!
Step 1: Gather Your Materials
 Before you get started, make sure you have all the necessary materials. You’ll need:
- One sheet of square origami paper
- A flat surface to work on
Step 2: Fold Your Paper
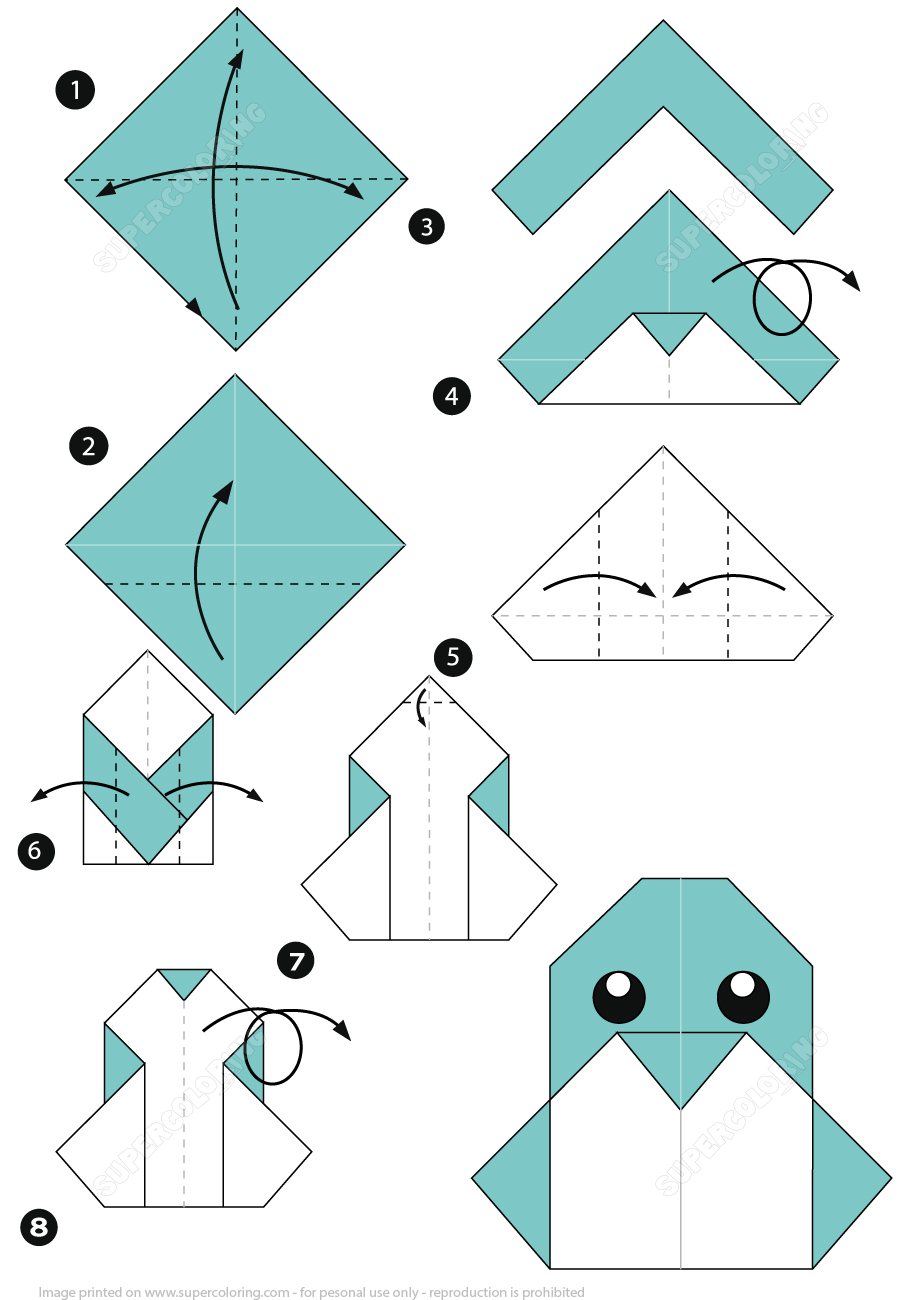
 Begin by folding your origami paper diagonally from one corner to the opposite corner. Crease and unfold. Then, fold diagonally from the other two corners and unfold again. Your paper should have diagonal creases in both directions.
 Next, fold your paper in half vertically and horizontally. This will create a smaller square with creases in the center.
 Turn your paper over and fold in half horizontally and vertically once more. This will create a small, folded square.
Step 3: Create the Penguin’s Body
 Using the center creases as a guide, fold the top and bottom edges of your paper towards the center. Your paper should now resemble a diamond shape.
 Next, fold the right side of the diamond towards the center crease. Do the same with the left side. Your paper should now be shaped like a tilted square.
 Unfold the right and left sides of your paper. This will create a small pocket on each side.
 Fold the right and left sides of your paper towards the center crease once more. This time, tuck the flaps into the pockets you just created. This will create a triangle shape at the bottom of your paper.
 Flip your paper over and fold the top point down towards the bottom of the triangle. This will create a small square at the top of your paper. Set your penguin’s body aside.
Step 4: Create the Penguin’s Head
 To create your penguin’s head, start by folding a new sheet of origami paper diagonally from one corner to the opposite corner. Crease and unfold. Then, fold diagonally from the other two corners and unfold again. Your paper should have diagonal creases in both directions.
 Next, fold the top and bottom edges of your paper towards the center crease. This will create a smaller square with creases in the center.
 Fold the right and left sides of your paper towards the center crease. This will create a small, folded square.
 Next, fold the top layer of the right and left flaps up along the crease lines. This will create a small triangle on each side.
 Take the top layer of the right and left flaps and fold them down along the crease lines to create a small square. Then, fold the square in half diagonally to create a small triangle. Your paper should now look like a narrow diamond shape with two triangles at the top.
 Unfold the triangles and fold the top layer of your paper down towards the bottom. Tuck the flap into the pocket you just created. This will create a narrow, pointed shape at the bottom of your paper. Set your penguin’s head aside.
Step 5: Combine Your Origami Pieces
 Take your penguin’s body and fold the top point down towards the bottom of the triangle once more. Set your penguin’s body on a flat surface with the triangle shape pointing upwards.
 Take your penguin’s head and place it on top of the triangle shape, pointed end facing upwards. Tuck the small point of the head into the pocket at the bottom of the body. Your penguin should now be standing upright with a small pointed tail at the back.
Step 6: Add Details to Your Penguin
 Use a pen or marker to draw on your penguin’s eyes, beak, and wings. You can also use colored paper to create fun accessories, like a bowtie or scarf.
There you have it! Your very own origami penguin. Use these free easy origami instructions to create a whole family of penguins, or try folding other animals like cats or dogs. With a little patience and practice, you’ll be an origami master in no time.